¶ Steps to Consolidate Extractions
This tutorial will walk you through the steps to create a "Consolidated Record" (the record of record to be used for analysis and reporting) from the multiple exractions from a single citation.
¶ Consolidation Steps
When you click the Continue button in the bottom table of the Comparison Tool, you will be taken to the Design Details tab. Since this tab does not depend on the structure of the Arms or Outcome tabs, you can first consolidate the information on this tab if you wish.
This is the general structure for most tabs (not Arms or Outcomes):
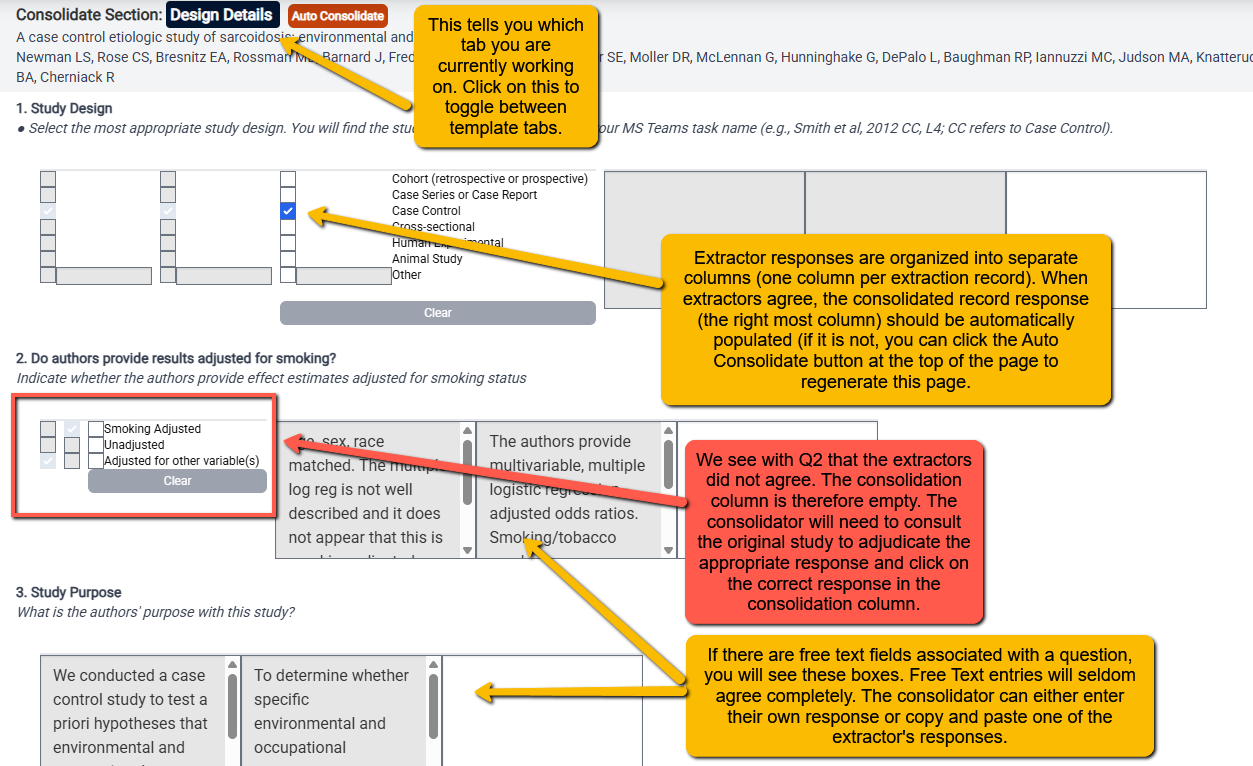
For a brief (3:25) walkthrough of the Comparison Tool and a typical page layout see:
Watch the video
We will now walk through the steps to consolidate extraction records.
Note: Because VADRR extraction records have a hierarchical structure (the format of some tabs depend on the structure of other tabs), it is vital to first harmonize the structure of the Arms and Outcomes tabs before attempting to work with the other tabs.
¶ 1. Harmonize Arms
While you do not need (or necessarily want) data extractors answers to be identical for all fields, you DO need for the structure of the Arms tab (or Diagnostic Tests tab, if you are doing a diagnostic accuracy project) to be consistent or "harmonized" across the extraction records.
Let's look at a typical example:
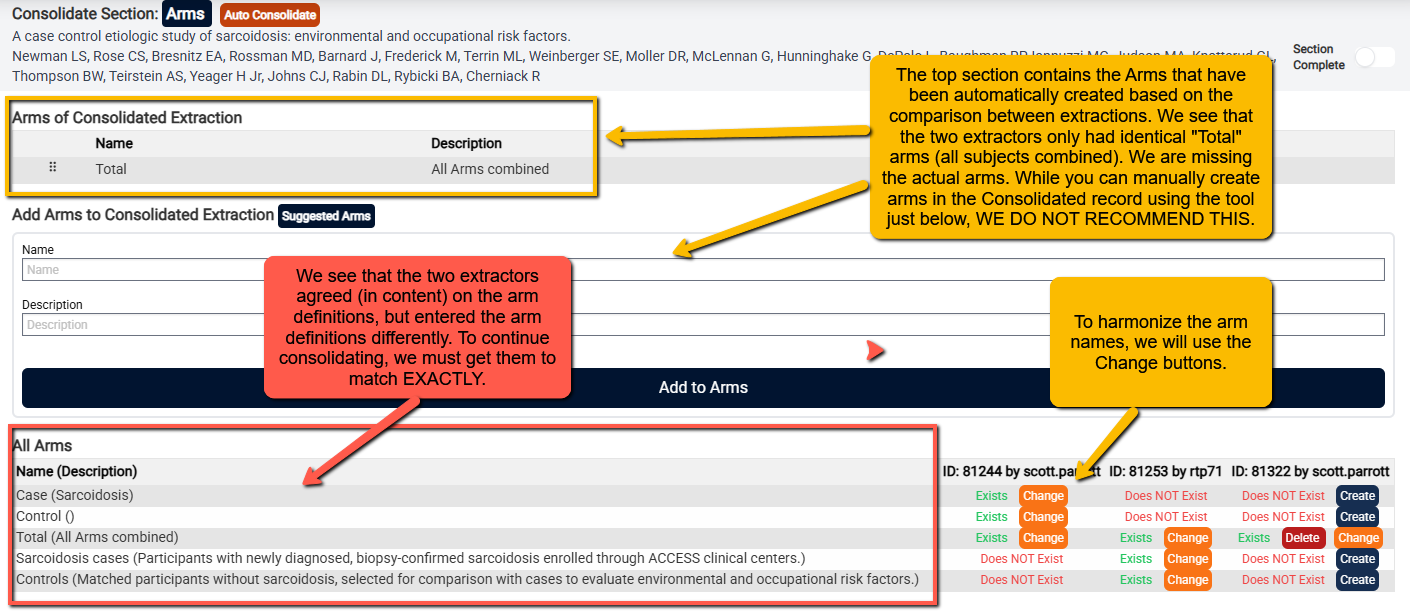
In the above example, we can see that while the extractors agreed on the arms (cases with sarcoidosis and controls), they named the arms differently.
In order to consolidate, we need the arm names to match exactly. To do this, we will use the Change buttons to the right of the arm names.
How do I decide on the "right" arm name?
There is no single right way to name arms. For simplicity sake, let's say that I wanted to keep the arm names simple (after all, detail on the arms will be captured in another tab). So, if I wanted to change the longer arm name to the simpler arm name, I would simply click on the Change button for the arm name I want to change.
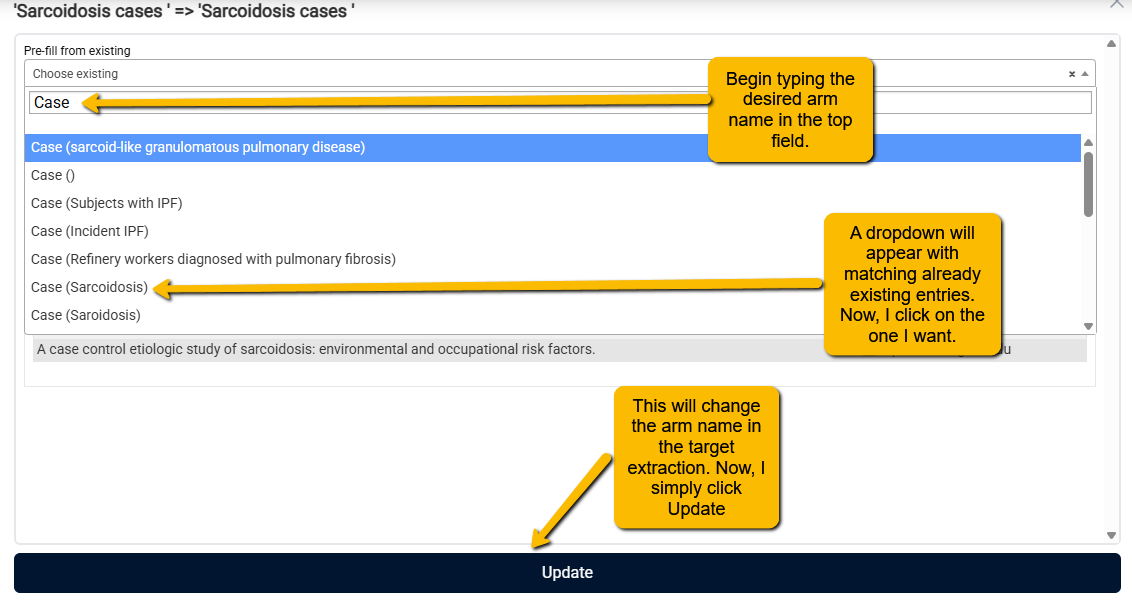
When I click on the Change button, a new window will pop up.
- Click in the Pre-fill from existing field
- Begin typing the desired arm name (hint: you can copy and paste the arm name from the other extraction if you want to make sure the two records match)
- Choose the desired arm name (arm description will be in parentheses) by clicking on it.
- Confirm the arm name
- Click the Update button
If the arm names now successfully match, I will see the bottom table change so that now the same arm name appears for both extractors.
Once they match, I can click the Create button in the rightmost column to add that arm to the consolidated extraction.

I now continue doing this for all arms. Once finished, I'll mark the Arms section as complete.
Watch a brief video on how to consolidate arms:
Watch the video
¶ 2. Harmonize Outcomes
Harmonizing outcome fields is the most complex step of the consolidation process. This is because each outcome has several different fields to be harmonized:
- Domain name (name of the outcome)
- Description
- Timepoints
- Populations (when findings are reported by subgroups)
Let's look at an example and then walk through how we would harmonize two extractions.
Examine the differences in how two analysts set up their extractions of the same outcome (rheumatoid factor positive):
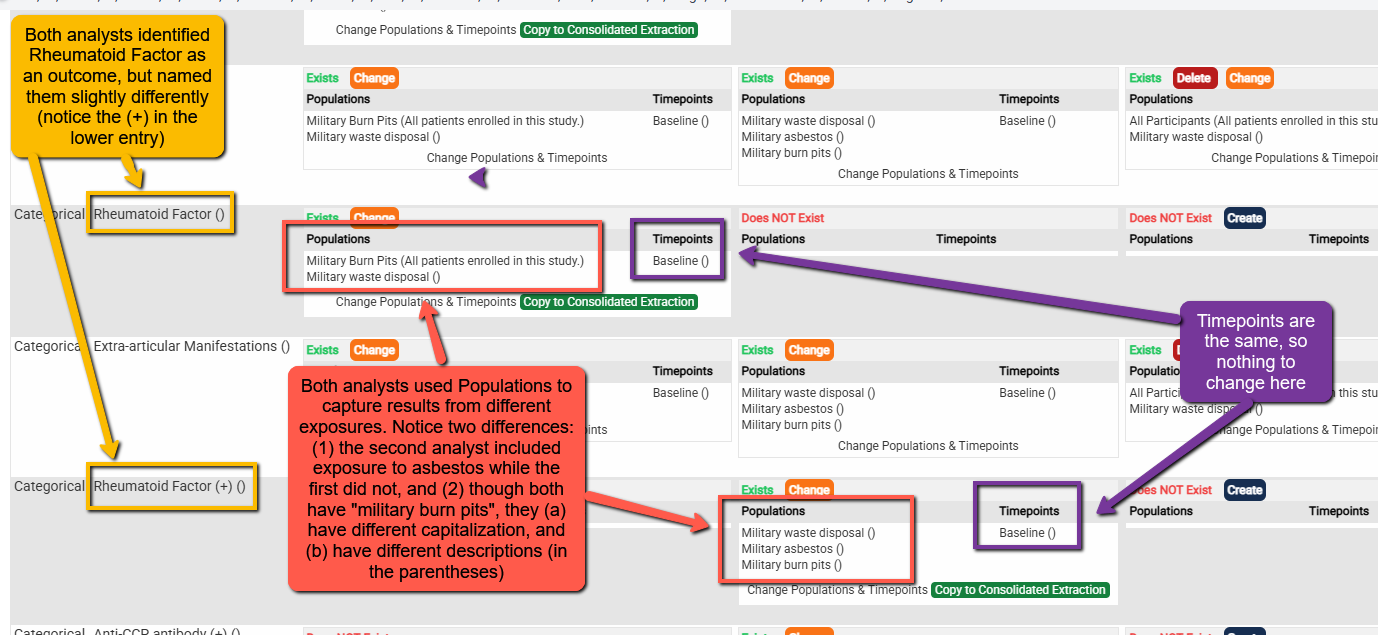
So, we will need to change three things:
- The names of the outcomes must match exactly
- The population names must match exactly
- The descriptions of the populations must match exactly
What about the missing outcome (Military asbestos)? We have two options here:
- Return the extraction assignment to the first analyst and ask them to include the asbestos outcome.
- Use only the second analyst's asbestos results to populate the consolidated extraction (checking, of course, for accuracy against the full text article).
We will go with the second option here.
¶ Step 1: Harmonize Outcome Names
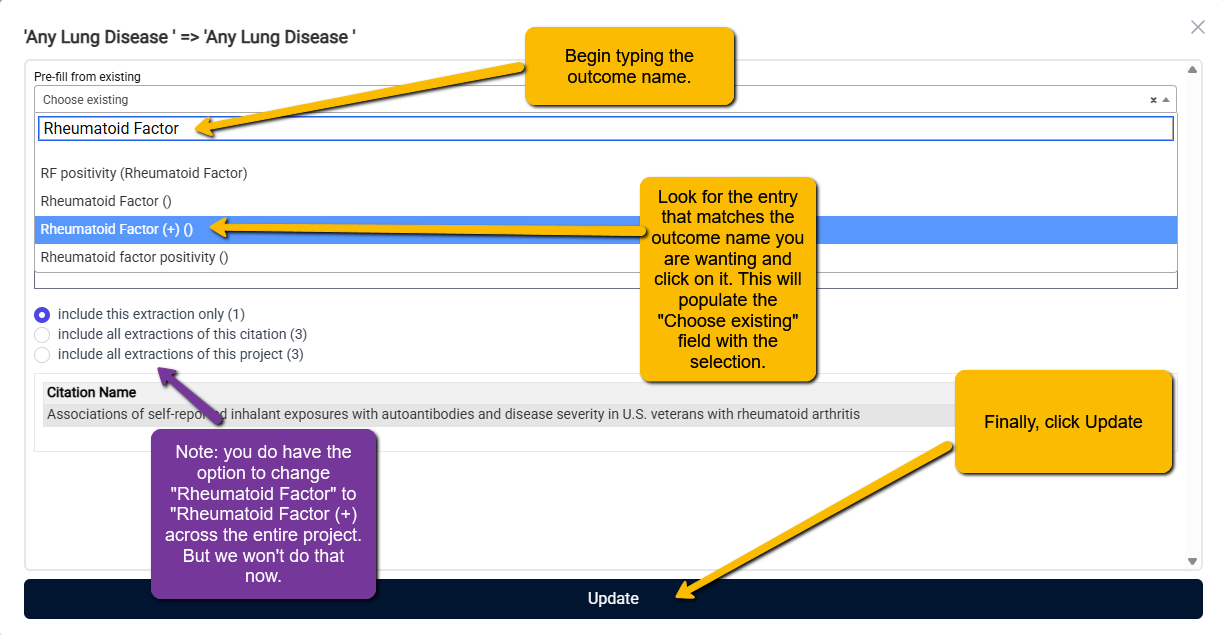
Because we want to include the asbestos outcome present only in the second extraction, we will want to alter the first extraction so that it matches the second. In fact, we just need them to match and it does not really matter which we choose (or if we choose to name them both something slightly different). But for simplicity's sake, we will change the first extraction outcome name ("Rheumatoid Factor") to match the second extraction outcome name ("Rheumatoid Factor (+)").
How to do this:
- Click on the orange Change button on the extraction we wish to change (this will open a popup window)
- In the Pre-fill from existing field, begin typing the outcome name of the second extraction (or, if you copied the name of the second outcome, just paste it into the field.
- Select the matching outcome name and description.
- Click Update
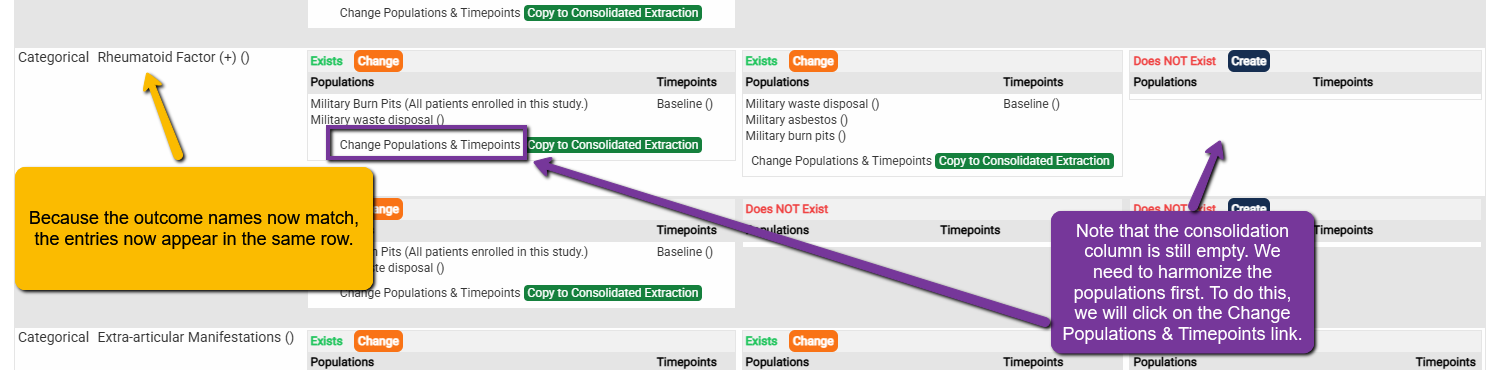
We can see that the outcome names now match and they are now both on the same line in the consolidation table.
¶ Step 2: Harmonize Populations (Names and Descriptions)
To match population names and descriptions, it really does not matter which extraction record we change as long as we get them to match. But, we will change the first one. We will make two changes:
- We will change "Military Burn Pits" to "Military burn pits"
- We will change the population description to remove "All patients enrolled in this study".
When we click on the Change Populations & Timepoints link, a new browser tab will open and you will now be in the first analyst's record.
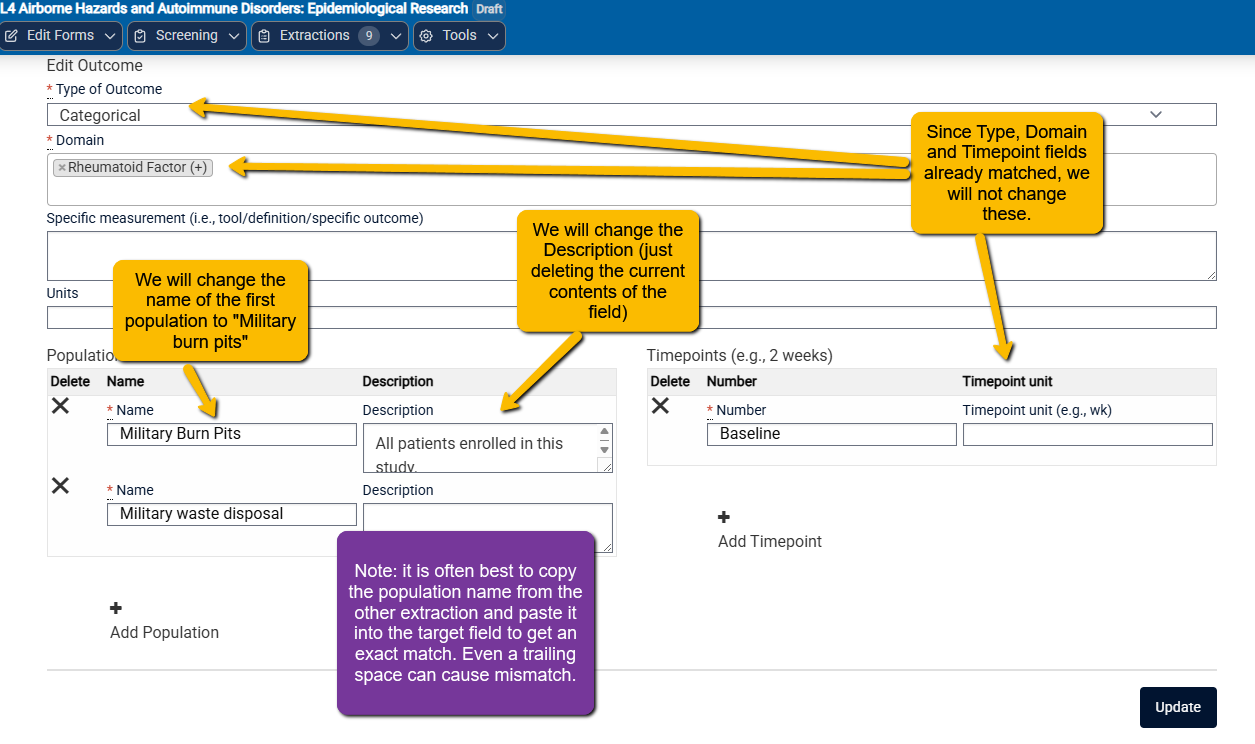
Navigate back to the tab with the consolidation tool open and click the refresh button on your browser. The two populations should now match.

You would do this for all population names.
¶ Step 3: Create the Consolidated Record Outcome
Now we are ready to create the extraction record. Above we noted that we will create the consolidated record from the most complete analyst extraction, so we will click on the Copy to Consolidated Extraction button on the second analyst's record (the one with three population outcomes).

Now the consolidated record column will populate with the outcome.
Once this is done for all outcomes, we are ready to move on to the Results tab.
¶ 3. Set Up Results Structure
A key reminder: You are creating a separate extraction record from the existing extraction records. The key is agreement in content (for accuracy). You do NOT need to have the extractions be identical (except, as mentioned above, on Arms and Outcomes).
There are four types of possible outcomes that all begin with default statistical fields (which can be changed):
- Descriptives
- BAC (between-arm comparisons)
- WAC (within-arm comparisons)
- NET (within and between arm differences)
Not every article will report all these values. So, you will only need to consolidate those relevant for your project and this article. We will cover consolidating Descriptives and BAC (between arm comparisons).
¶ Descriptives
In the simplest scenario, the extractors will have used the VADRR default statistical fields: Total N, Mean, SD. When this is the case, consolidating the values is simple. You will see a column with the data from each analyst and a rightmost column for the consolidation record values.
If the analysts values match, the consolidated record will be populated automatically. If they do not match, the consolidator must adjudicate the correct response with reference to the article.
However, authors often report measures that do not fit the default (Total N, Mean, SD). In this case, some set up of the results entry structure is necessary.
Let's look at an example:
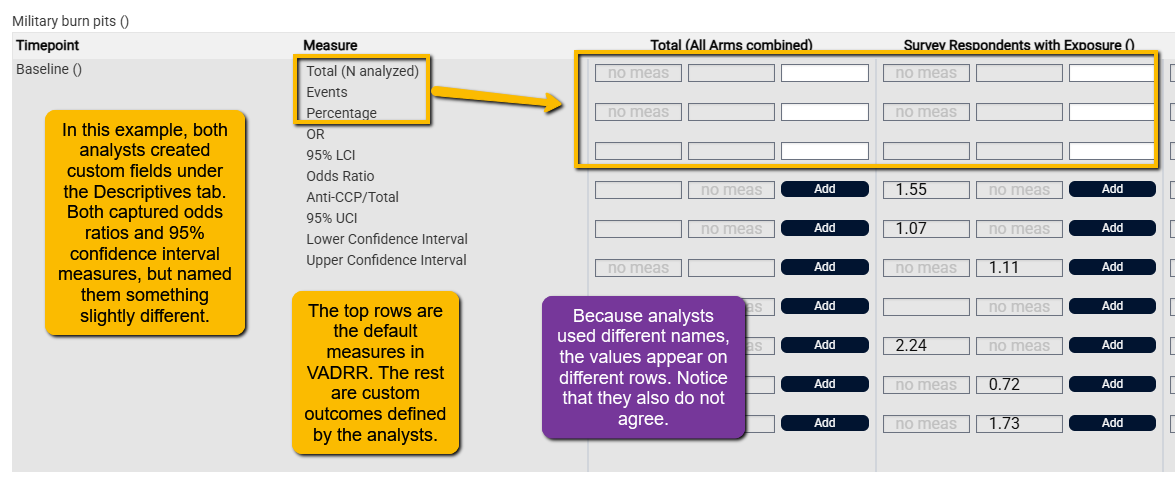
In the above example, both analysts decided to capture the odds ratios and 95% confidence intervals in the Descriptives section. This isn't ideal (these belong under the between arm comparisons (BAC) section), but we'll work with it.
Notice that the analysts named the measures slightly differently and they also disagreed on values. This means we need to:
- Decide on which measure names we prefer
- Check the values against the original article to ensure accuracy
What we will do:
- We will add the rows that match the measure names that we want to use
- We will transfer the correct values to the consolidated record (upon article check, the second analyst has the correct values)
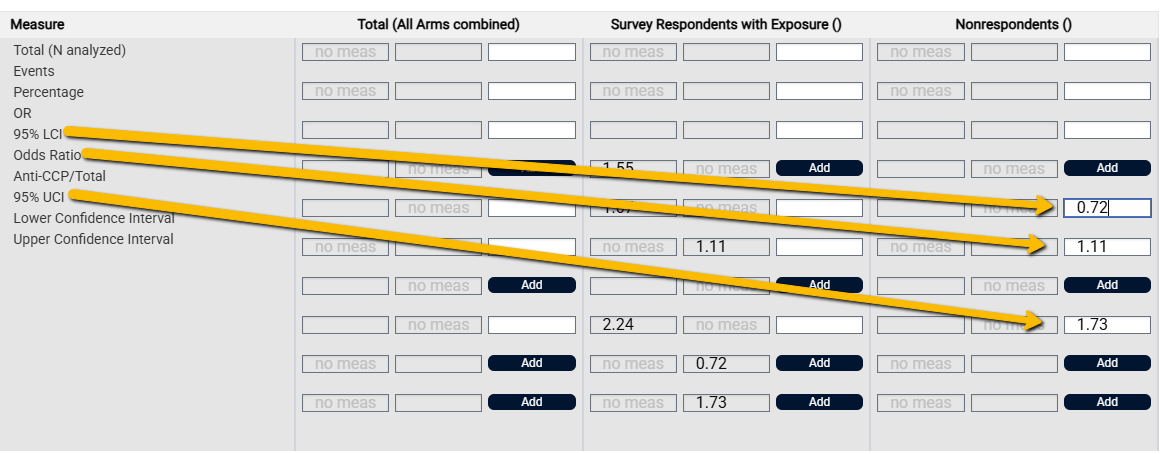
I clicked the Add buttons that corresponded to the measure names that I preferred, then I transferred the correct measures to the appropriate fields.
Note: data entry fields for the VADRR default measures are always available. Data entry fields for custom measures defined by the analysts must be added using the Add buttons.
¶ Between Arm Comparisons (BAC)
To set up between arm comparisons, you will need to define the comparison (e.g., exposed v non-exposed, cases v controls, etc.). If the analysts have set up the comparisons in the same way, the consolidated record column will have open data entry fields. If they have not, then you will need to do a little set up.
Watch a brief video on how to troubleshoot between arm comparison consolidation:
Watch the video
To set up Comparisons:
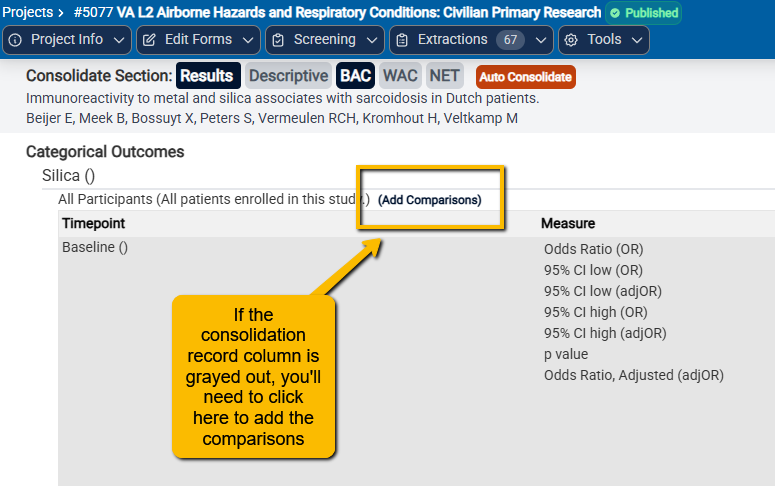
When you click on the Add Comparisons link, a window will open up:

Use the green arrows (< or >) to move the categories to the left and right boxes. Then click Add Comparison.
Note: It generally makes the most sense to move the response category (in the above example, the cases) to the left and the reference catebory (e.g. controls) to the right.
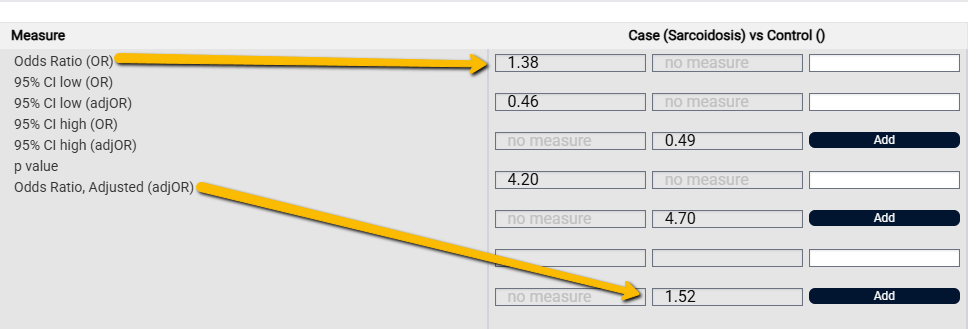
In the example below, we see that the analysts set up the comparisons in the same way (so there are open fields in the consolidation column). However, one analyst captured the unadjusted OR's while the other captured the adjusted OR's. We could capture both sets of values or we can choose between them. If we want to capture the adjusted ORs (typically what we'd prefer), then we need to click the Add buttons to open up those fields.
¶ 4. Complete Other Tabs
After consolidating Arms, Outcomes and Results tabs, consolidating the rest of the tabs is really pretty straight forward. Simply compare analyst responses and select the most appropriate response for the consolidated record.
¶ 5. Completion & Optional Quality Assurance
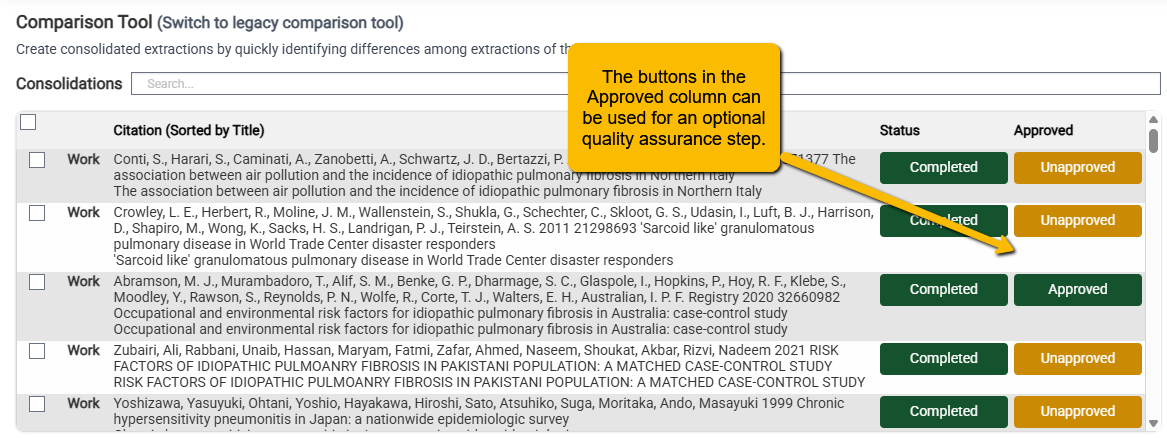
When all tabs have been consolidated, the consolidator can then use the upper table on the Comparison Tool page to mark the consolidation as Completed.
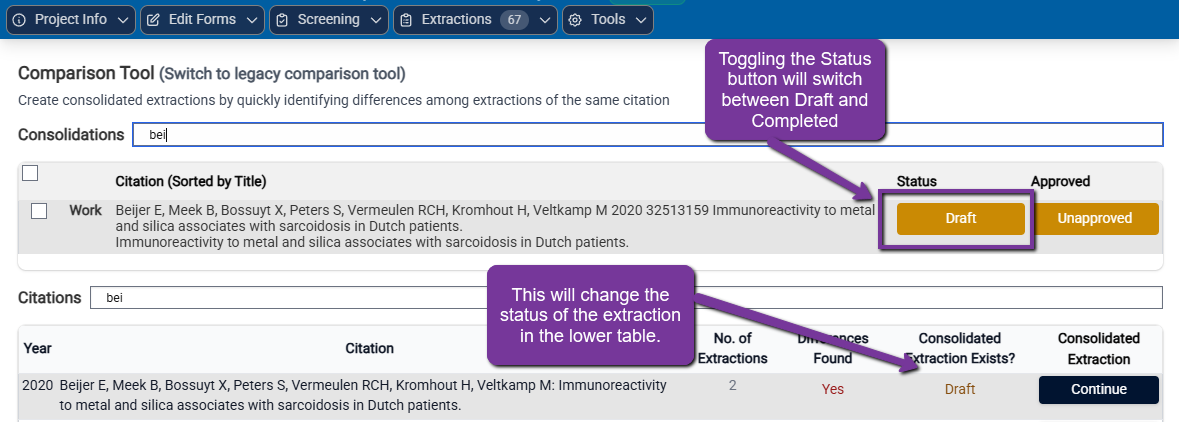
You will also notice that the upper table also has an Approved column. Depending on project needs and protocol, VADRR is set up to allow a final pass for record approval. For example, having a project lead review each consolidated record to ensure completeness and accuracy.
This is optional. But, to mark a consolidated record as Approved, simply click on the Upapproved button and it will toggle to Approved.
¶ Summing It Up
Remember, you are creating a separate record and the previous extractions are the raw material.
- Values are automatically populated where everyone agrees. Fields where all reviewers entered the same value are auto-consolidated for you — you don't have to touch them.
- You decide where they differ. Conflicting fields will leave the consolidation record column blank. For each one, pick a reviewer's value or type a corrected value into the consolidated record.
- This applies across the whole form.
- The consolidated record has its own status, moving from Draft to Completed as you finish.
- The original per-reviewer extractions are left unchanged (except for changes made to Arm and Outcome definitions) — the consolidation is a separate, authoritative record.
¶ After Consolidating
- The citation's consolidation status updates (see the status codes in
Citation lifecycle:cnc→cip→cc). - You can copy consolidated extractions to other projects from the Comparison Tool's
Consolidations table. - Consolidated data flows into your exports and
SR-360 results.